The most important advantage of LaTeX is that you need not worry about formatting the document. Globally specified, the formatting remains the same throughout the document. Just worry about the CONTENT. Preparing complex documents like, say a Book, becomes a tedious task once you have to keep adjusting the position of text relative to the figures and tables in the document. You end up spending more time formatting the document than adding content to it. More on the advantages sometime later. My attempt here is to encourage more people to use LaTeX. This post is not to condemn or highlight the short-comings of Word processors. Every person has their own comfort zone and being a tech geek, I would prefer preparing complex documents in LaTeX. For people who are not tech-savvy, better stick to word processors. So, decide if you are willing to give LaTeX a try before continuing to read further.
About Me
- Naren Bharatwaj
- Delhi, NewDelhi, India
- I am currently pursuing my Ph.D from IIT Delhi. I started blogging so that people don't face much of a hassle in finding solutions to problems that I've already faced and sorted out. Problems could be either hardware or software. Of late, it's becoming a hobby, especially after I received an e-mail from an anonymous reader from Germany who found one of my blog entries very useful.
Showing posts with label latex. Show all posts
Friday, July 9, 2010
Latex Tutorial: Lecture 1
OK guys. I've decided to write a series of blogs on how to start using LaTeX. This is for people who are willing to make a switch from MS-WORD/Open-Office/Pages to LaTeX to prepare their complex documents. The reason I use the word 'Complex' will be evident either later in the post or some other post that I will write later. First up, I'll cover the installation part on 3 Operating Systems (Mac OS X, Windows and Linux). This will be equivalent to overcoming a major hurdle for newbies (That's how I felt when I began learning LaTeX). Installing is not difficult, but a bit confusing. Hence, I've decided to dedicate a complete post to that. I plan to go in a step-by-step manner on how LaTeX works. Firstly, I'll start off by showing y'all a picture I came across on the Internet. This picture summarizes the need to make the switch when preparing complex documents.
The most important advantage of LaTeX is that you need not worry about formatting the document. Globally specified, the formatting remains the same throughout the document. Just worry about the CONTENT. Preparing complex documents like, say a Book, becomes a tedious task once you have to keep adjusting the position of text relative to the figures and tables in the document. You end up spending more time formatting the document than adding content to it. More on the advantages sometime later. My attempt here is to encourage more people to use LaTeX. This post is not to condemn or highlight the short-comings of Word processors. Every person has their own comfort zone and being a tech geek, I would prefer preparing complex documents in LaTeX. For people who are not tech-savvy, better stick to word processors. So, decide if you are willing to give LaTeX a try before continuing to read further.
Friday, March 5, 2010
Converting VISIO images to EPS
Sorry for being offline for so long. My triple-boot experiment has been a success. Now I run Snow Leopard, Ubuntu 9.10 and Windows XP. I'll write about this experiment sometime later. This week, I have something more interesting (according to me ;) )
Fortunately, i got an idea for my next blog entry this weekend. I had to convert a few VISIO images to EPS (Encapsulated Post Script) to attach them to report, to be prepared in latex.
For those of you who don't know about EPS format, EPS is a scalable vector format. Basically, you can scale the image and make it smaller/larger without losing its quality. EPS images are frequently used in preparing latex documents.
According to me, the best way to convert a VISIO file to an EPS file is as follows.
Pre-requisite: Install open-office
Step 1: Save the VISIO file in .wmf (Windows Meta File) format.
Step 2: Open this file using Openoffice Draw (Equivalent to VISIO, but open source).
Step 3: Right Click on the image and say "Save as Picture...".
Step 4: Change the type to EPS.
Since Openoffice is available on the 3 platforms I use, it makes my job a lot more simpler. I tried converting the ".wmf" file in both ubuntu and windows using draw and it worked like a charm. There was absolutely no difference in the quality of the output images.
Here are a couple of screenshots.
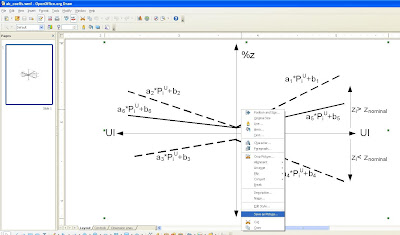

I also came across a wmf2eps converter. It's available here
The pleasure you obtain when you do something all by yourself is immense and I would like to stick to my methodology. During this exercise of getting my VISIO images converted to EPS, I came across various printer drivers that allow one to print the image as a PS(post-script) or EPS. A major glitch in this process is that the quality of the final image is not guaranteed to be as good as the original one. I also understand that VISIO2002 allowed one to save images in EPS format.
Fortunately, i got an idea for my next blog entry this weekend. I had to convert a few VISIO images to EPS (Encapsulated Post Script) to attach them to report, to be prepared in latex.
For those of you who don't know about EPS format, EPS is a scalable vector format. Basically, you can scale the image and make it smaller/larger without losing its quality. EPS images are frequently used in preparing latex documents.
According to me, the best way to convert a VISIO file to an EPS file is as follows.
Pre-requisite: Install open-office
Step 1: Save the VISIO file in .wmf (Windows Meta File) format.
Step 2: Open this file using Openoffice Draw (Equivalent to VISIO, but open source).
Step 3: Right Click on the image and say "Save as Picture...".
Step 4: Change the type to EPS.
Since Openoffice is available on the 3 platforms I use, it makes my job a lot more simpler. I tried converting the ".wmf" file in both ubuntu and windows using draw and it worked like a charm. There was absolutely no difference in the quality of the output images.
Here are a couple of screenshots.
I also came across a wmf2eps converter. It's available here
The pleasure you obtain when you do something all by yourself is immense and I would like to stick to my methodology. During this exercise of getting my VISIO images converted to EPS, I came across various printer drivers that allow one to print the image as a PS(post-script) or EPS. A major glitch in this process is that the quality of the final image is not guaranteed to be as good as the original one. I also understand that VISIO2002 allowed one to save images in EPS format.
I guess this would be really helpful for those looking to convert their VISIO images to .eps. Be on the lookout for such tips and tricks.
CYA
Friday, January 22, 2010
Import tables from excel to latex
Since this is my first post, I would like to write something that I have been obsessed with for the past few months........LATEX (yes, you read it right). Ever since my supervisor asked me to write a technical paper to be submitted to a journal in Latex, I've been intrigued with what Latex can do.
I got hold of some excellent guides to start off with, and since Latex is open source, there is abundant material available on the internet. After typesetting the initial part of my document, I had to add results that I obtained after simulation. All my results were in tables (numerical values), stored in an excel sheet. I found it really painful to enter the contents of the table one by one, separated by ampersands (&). I did this exercise for small tables, but how was I going to do this for a table of size 30x5 ?
I googled "Excel to Latex" and came across this very useful macro that provided me the code to paste in the latex editor, the contents of the table. All I had to do was install the macro and run it, after highlighting the table that I wanted to export.
I told my supervisor about my latest discovery and he was surprised to know about the availability of this useful tool. He confessed to me that as a student he used to enter the values manually.
Since I use Latex on UBUNTU (my favourite distro), I used the macro calc2latex. I've tried the excel2latex macro as well on office2003 and it worked satisfactorily. One of my colleagues had office2007 installed on his laptop and the macro gave some weird error. So, make sure you run office2003 for the macro to work.
The macro and the installation instructions are given here (linux) and here (windows).
Be on the lookout for such interesting experiences of my experiments with latex and of course ubuntu, and MAC OS X because I have a second generation MACBOOK (triple booting with MAC OS X (leopard), Ubuntu 8.04 LTS and WIN XP).
This will not only help me archive my work, but will also be useful to many others.
See you'll soon.
I got hold of some excellent guides to start off with, and since Latex is open source, there is abundant material available on the internet. After typesetting the initial part of my document, I had to add results that I obtained after simulation. All my results were in tables (numerical values), stored in an excel sheet. I found it really painful to enter the contents of the table one by one, separated by ampersands (&). I did this exercise for small tables, but how was I going to do this for a table of size 30x5 ?
I googled "Excel to Latex" and came across this very useful macro that provided me the code to paste in the latex editor, the contents of the table. All I had to do was install the macro and run it, after highlighting the table that I wanted to export.
I told my supervisor about my latest discovery and he was surprised to know about the availability of this useful tool. He confessed to me that as a student he used to enter the values manually.
Since I use Latex on UBUNTU (my favourite distro), I used the macro calc2latex. I've tried the excel2latex macro as well on office2003 and it worked satisfactorily. One of my colleagues had office2007 installed on his laptop and the macro gave some weird error. So, make sure you run office2003 for the macro to work.
The macro and the installation instructions are given here (linux) and here (windows).
Be on the lookout for such interesting experiences of my experiments with latex and of course ubuntu, and MAC OS X because I have a second generation MACBOOK (triple booting with MAC OS X (leopard), Ubuntu 8.04 LTS and WIN XP).
This will not only help me archive my work, but will also be useful to many others.
See you'll soon.
Subscribe to:
Posts (Atom)